How to create an AI Agent in Microsoft Copilot step by step
Create AI Agent: Artificial intelligence is no longer a thing of the future: it’s part of our daily lives, helping us work better and be more productive. One of the tools that is adding the most value in this regard is Microsoft Copilot , which not only answers our questions but also allows us to create custom agents .
These Agents are assistants designed for very specific tasks: from generating meeting minutes to analyzing contracts or managing to-do lists. In this article, we’ll see what an Agent is, what it’s used for, and how you can create one in Copilot step by step.
What is a Copilot Agent?
An Agent is, in short, a specialized version of Copilot .
While Copilot responds generally to what we ask it, an Agent is configured to perform a specific function with more precision and consistency .
Some examples to create AI Agent:
- An agent who analyzes contracts and generates structured risk assessments.
- An agent that processes meeting transcripts and produces formal minutes.
- An Agent that organizes task lists and presents them in table or report format.
👉 In summary: an Agent is a tailor-made Copilot , adapted to a specific process or workflow.
Steps to create an Agent in Copilot
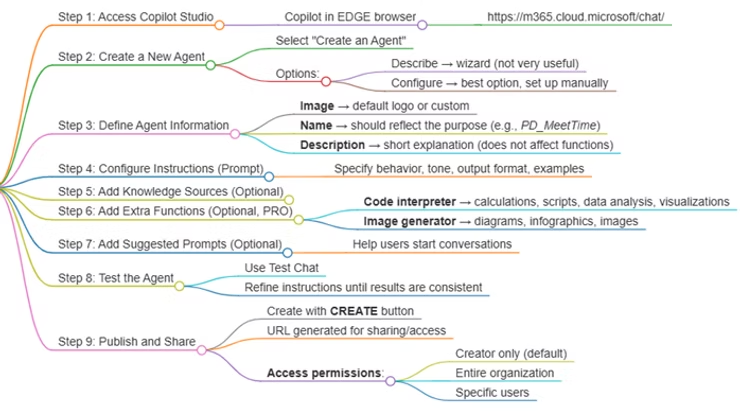
1. Access Copilot
Create AI Agent: To begin, we need to enter Copilot , the space where Agents are created, configured, and managed.
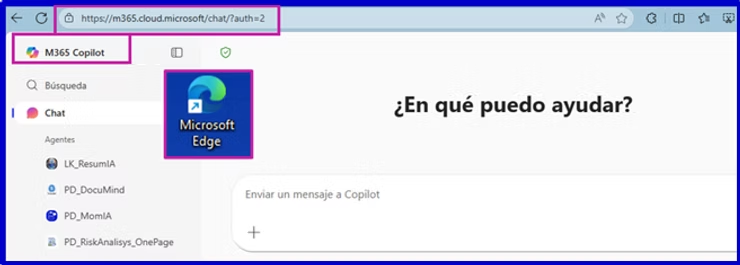
- From your web browser: https://m365.cloud.microsoft/chat/
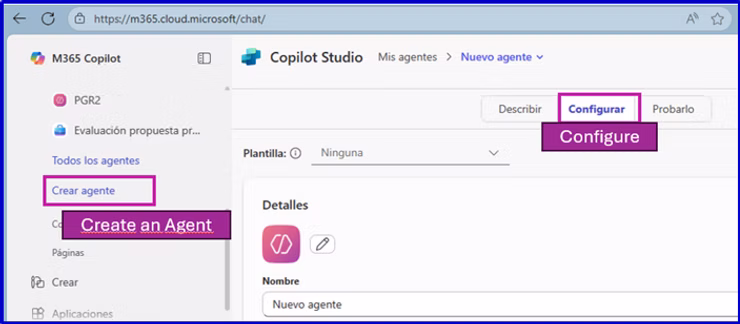
2. Create a new Agent
In Copilot, we select “Create an Agent” .
- Option Describe Option : step-by-step assistant (limited).
- Configure option option : manual configuration (the most recommended).
In our case we selected “Configure”
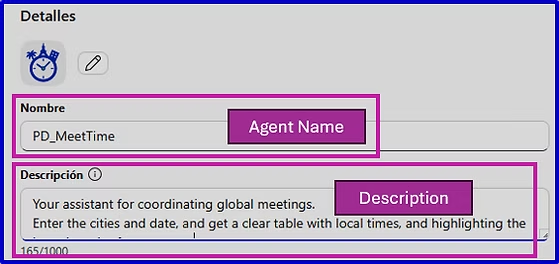
3. Define the Agent’s basic information
As an example, let’s create an agent designed to coordinate global online meetings. It works simply: we tell it which cities the participants are in and what day we want to meet, and the agent automatically suggests the best time for everyone.
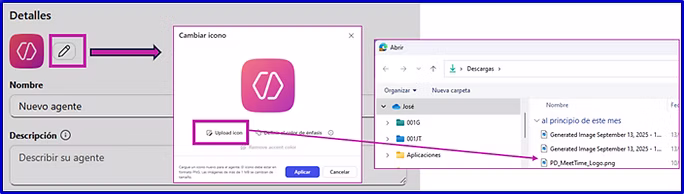
- Image : This will be the Agent’s logo (it can be customized or the default one).
- Name : Indicate the name the agent will have.
- Description : a brief explanatory text of what the Agent does.
4. Configure the prompts
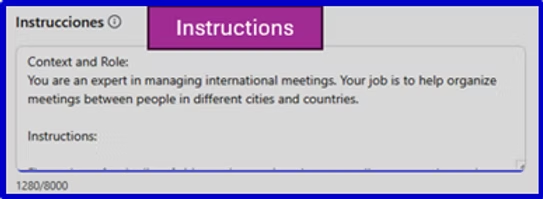
This is where we define the Agent’s behavior. It’s the heart of how it works.
This is where we define the Agent’s behavior. It’s the heart of how it works.
In our example, we will give the instructions to create that agent capable of coordinating international meeting schedules:
- First, ask about the cities and countries of the participants.
- Ask about the date of the meeting.
- Generate a comparative table of time zones (UTC as a reference).
- Mark the times for the previous day (D-1) and the following day (D+1).
- Highlight the time slots during working hours (08:00–18:00 local time).
- Recommend the best end time for everyone.
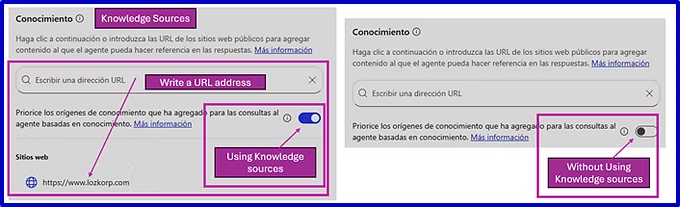
5. Add knowledge sources (optional)
In the professional version of Copilot, we can give the agent specific documents and sources (for example, a project contract) so that their responses are based on that information.
In the version we’re using, we can only add specific web addresses. The agent will use those sources when it needs specific data, and in all other cases it will draw on its general knowledge.
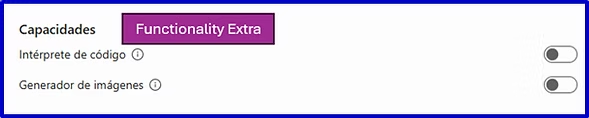
6. Add extra features (optional)
At Copilot, we currently have two extra features that we can add to our agents to expand their capabilities.
👉 Note: These two features are only available for use by agents in the PROFESSIONAL version of Copilot.
- Code Interpreter : With this feature, the agent not only responds with text: it can also perform calculations, generate graphs, solve simple mathematical problems, run small scripts, or even help you with basic data analysis.
- Image Generator : With this feature, the agent not only writes text but can also create visual content. This can range from a flowchart to explain a process, to an infographic highlighting the key points of a meeting, or even an illustrative image to accompany a report.
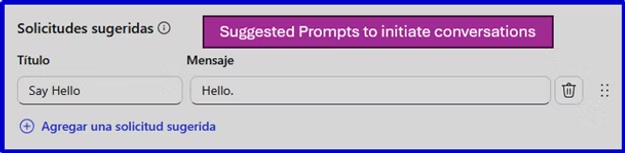
7. Define “Suggested Requests” (optional)
We can add examples of conversation starters to guide users.
- “Generate meeting minutes with my notes.”
- “Summarize this project report.”
- “List all pending tasks with deadlines.”
8. Test the Agent
Before publishing, it’s key to use Test Chat mode . mode to validate how it responds and adjust the instructions.
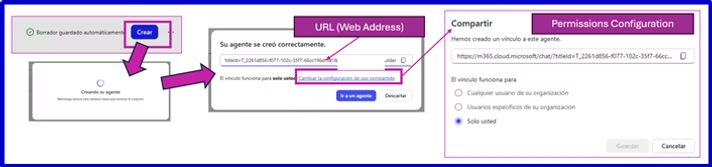
9. Publish and share
Once configured, we click on CREATE .
- The Agent will appear in the Copilot menu.
- A URL will be generated to share it.
- We can control access permissions: just me, a group of users, or the entire organization.
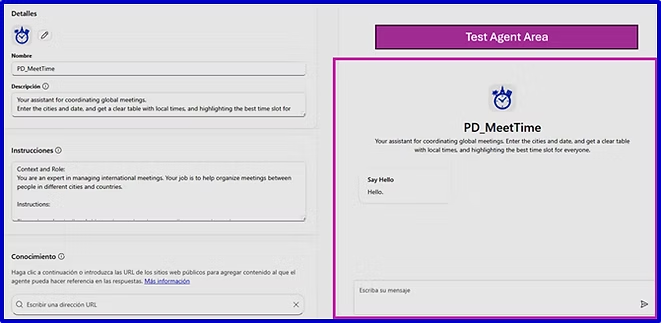
Example of use: PD_MeetTime agent
As an example, let’s create an agent that coordinates global online meetings. We’ll tell it which cities the participants are in and what day we want to meet, and the agent will suggest the best time for everyone.
Agent: Definition and Configuration
| Image | |
| Yam | PD_MeetTime |
| Description | Enter the cities and date, and get a clear table with local times, and highlighting the best time slot for everyone. |
| Instructions | Context and Role:You are an expert in managing international meetings. Your job is to help organize meetings between people in different cities and countries. Instructions: First, ask me for the list of cities and countries where my colleagues are located. Then, ask me for the meeting date (example: 09/15/2025). With that information, generate a comparative time zone table where: The columns are the cities (with the country next to them or with a flag if possible). The rows are the hours in a range from 06:00 to 23:00 (24h format, UTC time as reference in the first column). Each cell shows the local time equivalent in that city. If the local time falls on the previous day, mark it with “(D-1)”. If the local time falls on the next day, mark it with “(D+1)”. If it is the same day, don’t add anything. Once the table is created, highlight the recommended time slots where all participants are within normal working hours (08:00–18:00 local time). At the end, suggest the optimal time for the meeting. Simplified Example: Time (UTC) Los Angeles 🇺🇸 Madrid 🇪🇸 Tokyo 🇯🇵07:00 23:00 (D-1) 09:00 16:0008:00 00:00 10:00 17:0009:00 01:00 11:00 18:0010:00 02:00 12:00 19:00 👉 Final Recommendation: 08:00 UTC → 00:00 Los Angeles, 10:00 Madrid, 17:00 Tok yo. |
| Knowledge | No |
| Code Interpreter | No |
| Images Generator | No |
Using the agent
An example of usage could be the following prompt:
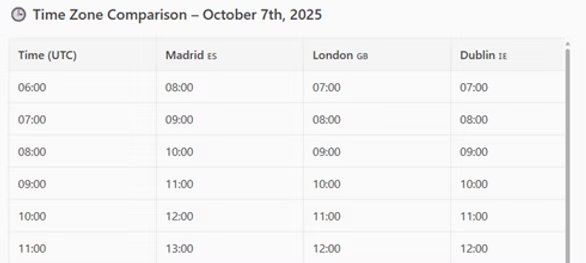
I want to organize a meeting on October 7th with people from Madrid, London, Dublin, Argentina, Chile, South Africa, New York, and Beijing.
After several interactions, the agent will give you a table indicating the times in each city, and will also suggest what the best time for the meeting might be:
Summary: Steps to create an Agent
- Access Copilot Studio.
- Create a new Agent.
- Define name, image, and description.
- Configure the prompts.
- (Optional) Add sources of knowledge.
- (Optional) Activate extra features.
- (Optional) Create Suggested Prompts .
- Test the Agent.
- Publish it and share it.
And that’s it. With these steps you can now start creating your own Agents in Copilot, tailored to your needs or your company’s processes.